 |
| Froghemoth, rust monster, cloaker, and chuul. |
Between a change of jobs and a hefty amount of gaming, it's been over six months since my last "Building the Bestiary" column. I've given a great deal of thought to what to cover in this next installment, and settled on aberrations. In D&D 3E and Pathfinder lore, aberrations are unnatural creatures, often with alien origins connected to the Far Realms (3E) or the Dark Tapestry (PF). Many aberrations have alien anatomy such as tentacles, or the wrong number of eyes or mouths, but not all can be identified in this way.
My past columns in this series have featured a number of aberrations, which I won't be covering in this installment as a result:
- #12: Vermin: drider, ettercap.
- #13: Non-OGL Monsters: beholder, carrion crawler, mind flayer, umber hulk.
- #16: Serpentine Creatures: grick, naga, neothelid.
Starting Small
The simplest aberrations are also the smallest. A will-o'-wisp can be represented by a crystal ball or other transparent brick, by a skull-faced minifigure head "floating" on a clear brick, or even by an unusual color of flame.
A choker is a short black-skinned humanoid with unnaturally long arms. You can represent these long arms by attaching a lever to each of the minifigure's hands, or by attaching 1x2 plates with clips on the end (which become the claws). For the latter, attach the hand to the post inside the bottom of the plate; this gives better "clutch" than simply inserting the stud-sized hand into the end of a 1xN plate.


 A gibbering mouther is a mass of protoplasm covered in eyes and mouths. Rendering this as a Medium-sized mini is a bit challenging, but still possible using the smallest SNOT bricks, toothed plates, horns (for tongues), and eye tiles.
Building a mimic depends on the form it has taken to disguise itself. The classic example is a chest which sprouts a toothy maw and pseudopods when it attacks. To build one, simply attach bricks with clips to the handles of a LEGO treasure chest. A tongue can be made with a small Castle cape attached to a few bricks that sit inside the chest.
To create other disguises for a mimic, take an existing part or assembly (such as a sarcophagus or door) and find ways to attach a mouth and attacking limbs to existing LEGO models. If those parts can be quickly added to the base item when combat begins, even better.


Rust monsters resemble giant beetles more than anything else, so can easily be built with some of the techniques from my column on Vermin. The two models shown here are built from a variety of small plates and bricks. The one on the left uses two 1x2 plates with bars to attach the front legs (to the lower plate) and head and antennae (upper plate).

 The rust monster on the right is built around a base of three 1x1 SNOT ("studs not on top") bricks. The middle one has studs on four sides; the other two each have studs on two sides, and are attached sideways to the center brick. 1x1 plates with top-clips are used for the beak and to attach the tail. The faucets forming the upper legs are inserted into holes in the side-studs.
Larger Horrors
SNOT bricks are also used heavily in the bodies of my otyugh models, in order to attach their three legs, two tentacles, and a decorated plate for the mouth. The eyestalk (featuring a headlight brick) is centered on the body using a 2x2 jumper plate.

I have presented two brick-built models here to demonstrate different approaches to crafting a giant ray- or bat-like monster. The first one combines a hinged wing technique (see For the Birds) with a hinged tail (see Serpentine Creatures). A couple of jumper plates on the base plate allow it to stand upright in an attack posture.

The other model is based on the giant vampire bat from the LEGO Games HEROICA set Ilrion. The base of this model--a special SNOT brick with bat/dragon wings attached using 1x1 clip plates--is very versatile, and has been used in other official sets such as the microscale Minecraft Ender Dragon (see How to Cheat (at Building) a Dragon). A couple of toothed plates provide ears or horns, and a printed 1x1 tile suggests the gaping mouth. The same model can be used for a dire bat or mobat, and a rider can be added by using a microfigure (or by using the anti-studs in the legs of a seated minifigure, though the result will be a little off-center).


A chuul is a large lobster-like monster with a mass of tentacles around its mouth. For my model, I've built the body and limbs out of a variety of hinges and ball-and-joint connectors. The tentacles are a couple of seaweed bricks attached to the head with clips. This miniature is a little bit oversized for a Large creature, but it was a challenge to fit the amount of articulation I wanted into this size. (As it was, I kept the front pair of walking legs straight and rigid to help the model's overall stability.)


Massive Abominations
The first Pathfinder RPG Bestiary includes two Huge aberrations: the aboleth and froghemoth. My models for these two monsters are actually older than most of the others in this column--I built them for fun some years ago, and have made minimal changes to them for this column. (The aboleth has seen play since then, in my last Freeport campaign.)An aboleth has a vaguely fish-shaped body, with three eyes arranged one above the other, and four long tentacles. I used plates to built the outline of the body, with a few hinges to allow the tail to bend. The tentacles are whips attached to 1x1 plates with bar-sized hoops.


The froghemoth is a giant alien amphibian that first appeared in Expedition to the Barrier Peaks. Due to my interest in that module, I've followed Erol Otus's original design rather than the more recent art used in Pathfinder and D&D 5E. (The snorkel-like nostrils, built with faucet bricks, are one of these original details that I kept.) The body is built out of sloped bricks to create a hulking frog shape, with lighter colored bricks on the belly. The model is mounted on a 8x8 plate to mark the Huge space it occupies; I chose a transparent blue plate because of its watery home.
The four tentacles are attached to 1x1 cones and then to SNOT bricks; mini-slopes beside their bases help bulk up the "shoulders" a little.
The eyestalk is attached to a hinge mounted on jumper plates. (If the GM desires, this subassembly could be removed and placed on a smaller base, for when the froghemoth hides underwater with only its periscope-like eyestalk showing.)
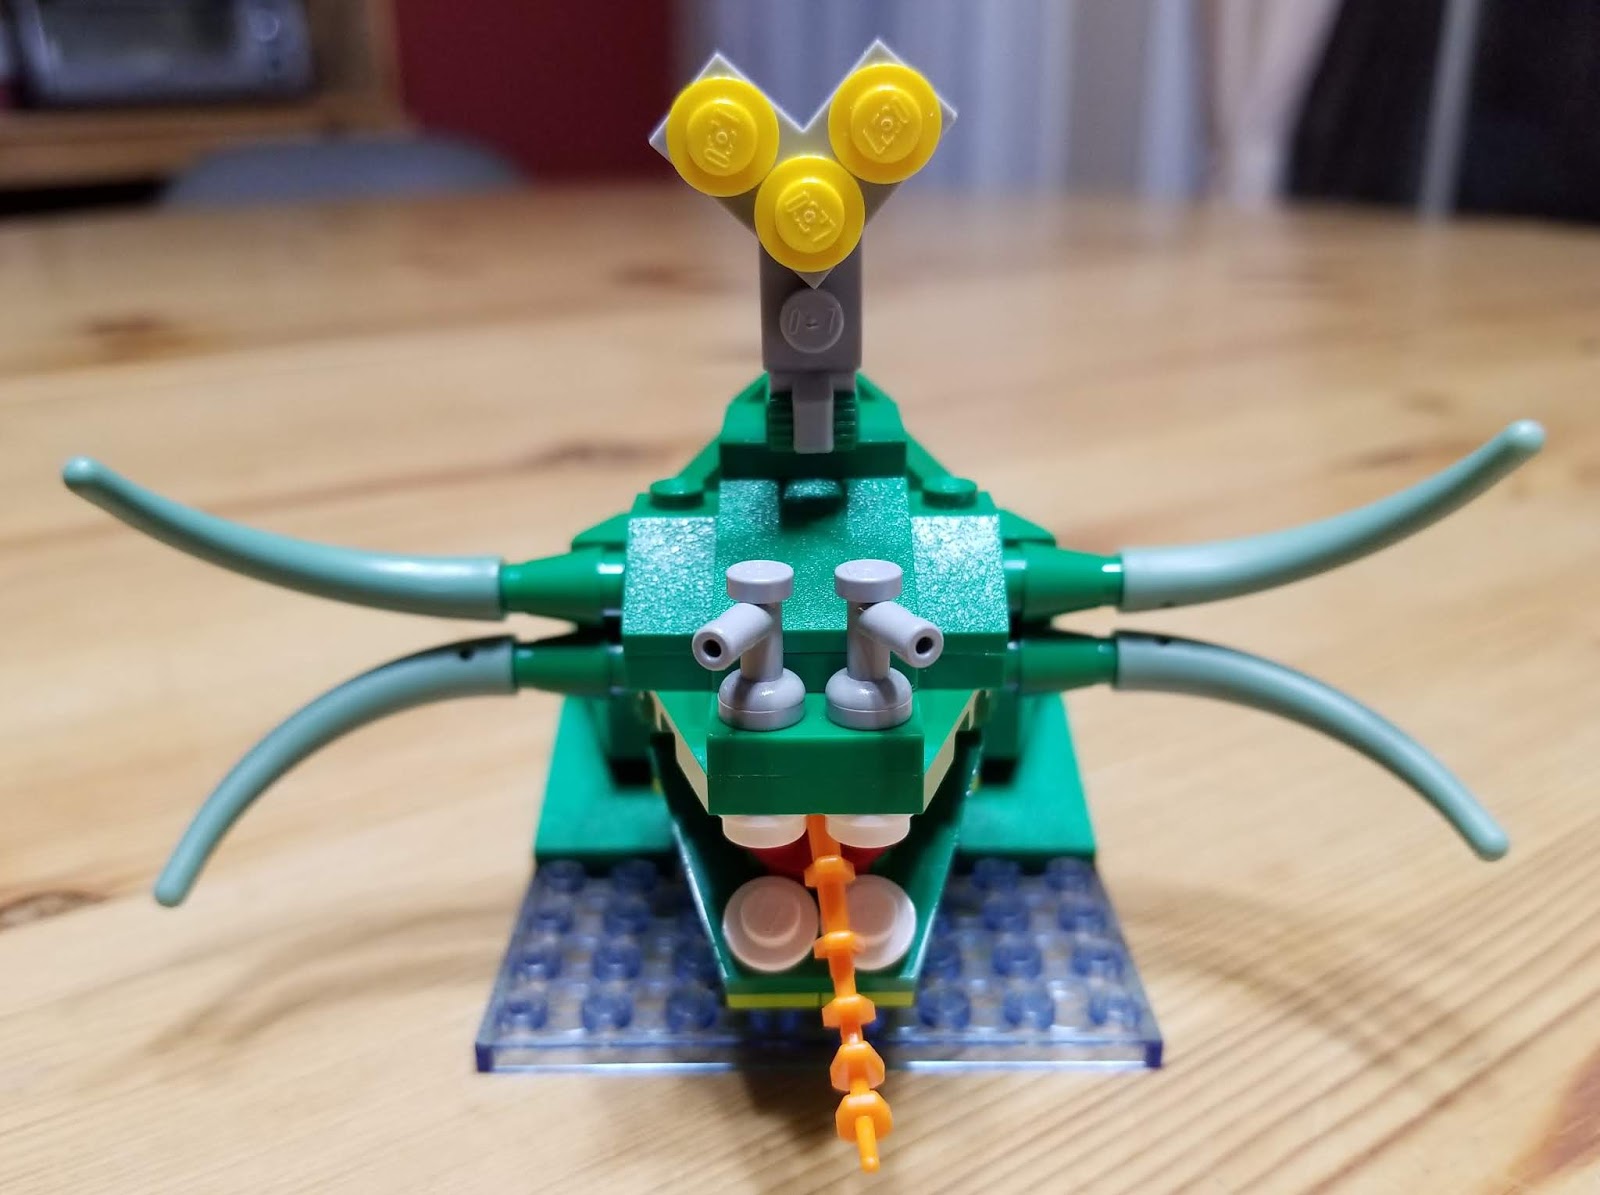


The mouth's upper jaw is built as an extension of the main body piece, but the lower jaw is mounted on a 1x2 hinge brick so that it can open wide enough for the tongue (built from a 2x2 round plate and an orange vine piece) to shoot out to menace the froghemoth's prey.

Appendix: Past "Building the Bestiary" Columns
[#0]: How to Cheat (at Building) a Dragon#1: Humanoids
#2: Underwater Races
#3: Giants
#4: Undead
#5: Tiny Creatures
#6: Four-Legged Friends
#7: Oozes
#8: Spell Effects
#9: Elementals
#10: Devils
#11: Aquatic Animals
#12: Vermin
#13: Non-OGL Monsters
#14: Plants
#15: For the Birds
#16: Serpentine Creatures
#17: Demons
Index
I've really enjoyed your series on how to use minifigs for tabletop roleplaying! I am introducing both my kids to D&D this summer and we have been using Lego as miniatures and terrain. I will be posting and article about this on my blog and was hoping to add a link to your blog series as reference for people who might be interested in this!
ReplyDeleteLink away!
Delete